Motivation
Tracking application errors should be a check list item for all production apps. In simple cases, a automatic “email the stacktrace to admin” is suffice to start but reaches the limit very fast. Items like
- Javascript Error Tracking, (in 2019 with source maps),
- Environment information, like logged in user,
- combining, ignoring, merging errors,
are requirements most growing projects will have sooner or later. Having an error tracking system in place is the best solution.

For our case, we prefer to self-host solutions like this, which has significant advantages:
- no additional data protection issues, or signing additional data processing agreements, as all the data remains in the company’s sphere of influence.
- integration with company systems, like VPN/SAML usually more easy or is even only self hosted possible,
- sometimes being the only user of your systems provides performance benefits, e.g. comparing with using Sentry’s hosted version, our current installation is orders of magnitude faster, also because the error tracking is most of the times within 5ms, also because the error tracking and app servers are not only in the same country but maybe even the same DC.
- saving some money per month instead of paying “per app”
On the downside, running things themselves can be more risky, especially when a Error tracking system is hard to setup.
From the very beginning, we used Errbit error tracking, which provides a Airbrake compatible API. But having tried out Sentry.io for private projects before, I was blown away be the features, like tons of plugins, beautiful clean UI, top notch Javascript integration with breadcrumbs and source maps, so I’ve decided to set it up in a self-hosted manner for our company pludoni. Fortunately, Sentry provides a Docker installation script, which I will use during this guide.
Installation of self hosted Sentry
![]()
First, we set up a Cloud VPC. Size of the cloud instance depends on your prospected error volume. We started with a Hetzner CX21 which costs about 5 EUR per month and can be upgraded easily via button click and restart later on if necessary.
After starting the instance, install Docker and Docker compose, or do it like us, and use a cloud-config yaml when installing, e.g.:
# cloud-config
apt:
  sources:
    docker.list:
      source: 'deb [arch=amd64] https://download.docker.com/linux/ubuntu $RELEASE stable'
      keyid: 0EBFCD88 # GPG key ID published on a key server
packages:
- apt-transport-https
- bash-completion
- ca-certificates
- command-not-found
- curl
- debian-archive-keyring
- dnsutils
- fail2ban
- docker-ce
- docker-compose
- golang-go
- git-core
- htop
- lshw
- lsof
- ltrace
- make
- software-properties-common
- sysstat
- tar
- unattended-upgrades
- vim
After powering up, clone this repository to /opt/sentry
$ git clone https://github.com/getsentry/onpremise /opt/sentry

# Or, use this fork that has Caddy/Letsencrypt support
$ git clone https://github.com/merantix/sentry /opt/sentry
This setup will include everything you need BUT a HTTPS proxy. To have Caddy run as an HTTPS Proxy with Auto-Letsencrypt, check out this fork merantix/sentry.
Adjustments and configuration
If you are wanting to run Sentry in a organisation setting, you might want to install some plugins. In our case, these are a Mattermost plugin and a SAML2 plugin for user authentication.
Add those requirements to the Dockerfile in the getsentry folder:
# /opt/sentry/Dockerfile
ARG SENTRY_IMAGE
FROM ${SENTRY_IMAGE}-onbuild

+ RUN pip install https://github.com/getsentry/sentry-auth-saml2/archive/master.zip
+ RUN pip install -e git+https://github.com/NDrive/sentry-mattermost@master#egg=sentry-mattermost
+ # Or instead, a forked version with Mattermost multi channel support
+ RUN pip install -e git+https://github.com/zealot128/sentry-mattermost.git@merged#egg=sentry-mattermost
(If you are using Mattermost, and like to reuse webhooks between multiple channels/projects, I’ve recommend my fork until this PR is merged)
Now, check out configuration in docker-compose.yml and env. In general, we had very little configuration:
- SENTRY_SECRET_KEY in
env(or will generate during installation) - changed Caddy hostname in
Caddy/Caddyfile, make sure, that hostname resolves to the server’s ip for letsencrypt - set, or remove email settings in docker-compose.yml or env
If you are finished, run:
# will ask for a start password for the admin user
$ ./install.sh

# start all the services
$ docker-compose up
Some quick docker-compose commands you might need later on:
# show stdout of a host
$ docker-compose logs web

# enter a host
$ docker-compose exec web bash

# start/stop a host
$ docker-compose restart web
$ docker-compose up web
$ docker-compose down web
SAML
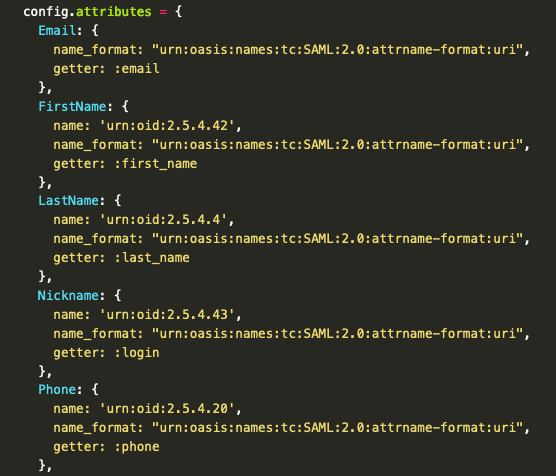
If you are using a SAML2 provider for your organisation, you can try to add the SAML authentication next. The specific settings are not standardized, and almost all supplier use different kind of names for the person’s attributes (Claims). For example, we are using a (of course self hosted) custom SAML2 server based on Ruby-SAML by Onelogin and also added several extra fields via a OID extra.

Those settings are based on these attributes (claims) by Ruby SAML, but like I said, that depends on your provider:
Debugging attribute mapping
To find out the specific names of the mapping, that you can use, you can add a print statement into the right Django file. I’ve gone this way:
$ docker-compose exec web bash
$ vim /usr/local/lib/python2.7/site-packages/sentry/auth/helper.py
Add import pprint somewhere in the top of the file, and add a printf statement in the finish_pipeline function:
+ import pprint

# ...

    def finish_pipeline(self):
        data = self.fetch_state()

        # The state data may have expried, in which case the state data will
        # simply be None.
        if not data:
            return self.error(ERR_INVALID_IDENTITY)

        try:
+           pprint.pprint(data)
            identity = self.provider.build_identity(data)
Exit the docker container and restart web docker-compose restart web. Now try set up of auth again and watch docker-compose logs web for debugging output.
Mattermost
![]()
Mattermost integration was straight forward:
- Create a webhook as a Mattermost admin, copy the API url
- Mattermost must be enabled as a Legacy Integration per project, after enabling add Webhook url.
- My fork of the plugin also supports changing the channel per project and reusing the Webhook.
In the next part, I will show our specific Rails integration to make error tracking as useful as possible.